
GIMP is one of the favorite graphics editor application designers. This application has three main characteristics that make a climb in popularity, which is freeware, opensource and multi-platform (available on the Windows version, Mac and Linux). Equipped with a wide range of features, such as the availability of plugins, filter, brush and scattered in the internet community's support GIMP.
GIMP so far have not become an application that could replace the popular applications such as Photoshop, but from day-to-day development of the next version of GIMP and more close to the display function of Photoshop. You can use this application to create graphic design, creating logos, edit images and create a simple animation (using the plugin GAP (GIMP Animation Package). But, still many people who are not familiar with this opensource application, how to make use of many different the difficult switch from Photoshop is expensive and paying.
In this article will be reviewed eight tricks and tips to make the GIMP application into a more serious so that they can replace Photoshop. GIMP tricks that are used with this version using the 2.6, but most likely also be applied for the next versions.
Install Plugins, Brush, and Filter
You must know how to install add-ons. How very easy and does not take much time. First you must find the location of the folder where the files are stored GIMP. The location depends on what operating system you use:
* Windows: located in the folder C: / Programs / GIMP
* Mac: right click and select the application folder
* Linux: press Ctrl + H in the Home folder to display the folder. Gimp that is hidden.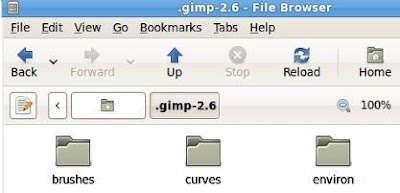
To install the plugin, brush, or filter, just copy and paste into the appropriate folder and restart GIMP.
1. Adding Plugin PSPI
PSPI plugin allows GIMP to be able to use Photoshop plugin. This will increase the number of filters that can be used by the GIMP and Photoshop for the user they can move to the GIMP without the need to leave the list of add-ons that they already collect.
To be able to use it, download first plugin PSPI from here.
In the Folder : program GIMP copy and paste the entire content of the PSPI plugin has been downloaded to the folder in Plug-ins. After that restart GIMP and open the filter menu. IN the bottom, you will see a new option, which is "Photopshop Filters Plug-In Settings" Choose to create a Photoshop dialog box, and navigate to the folder where the location of the collection of Photoshop plugins that you save.
2. Install Layer Styles
Layer Styles is very important feature for Photoshop users, and will be very difficult for users to switch to a similar application without the features. GIMP is actually in the Layer Styles have also just call different, here called Layer Effects, and included the effect Drop Shadow, Inner Glow, Outer Glow, Gradient overlay, Stroke, Bevel and Emboss, and others. With it you can quickly use a certain effect to the layer without eating a lot of effort and time.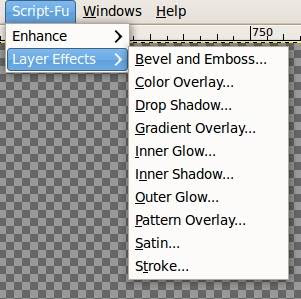
Download Layer Effects for GIMP from here. There are two versions of the plugin, the Script-Fu and Python. Python version allows you to be able to see the effects of changes in the form of a preview. While the Script-Fu can not. No matter which version you choose, keep it in the folder plugin Plug-in and restart GIMP.
If you download the version of Python, the Layer Effects will in Image> Layer> Layer Effects. Then for Script-Fu version will appear in the Script-Fu> Layer Effects.
3. Adding CMYK Support
CMYK Color Mode.pngCMYK is a continuation of the four colors Cyan, Magenta, yellow, key (black). In relation to the application program image editor and graphics, CMYK color model is a different Primary Subtraktif with the RGB color model (Red, Green, and Blue) is generally used. Color model is known as color separation / Separation four color used to print gamabr machine with the printer, where the colors are usually used for printing on various media such as hard for Brochures, Books, Magazines, CD Cover, Print T-Shirt dll.
Mixture of yellow and the feel of Cyan color green, yellow with a mixture of nuances Magenta produce red, while the mixture with the Cyan Magenta produce a blue tone. In theory, a mixture of three pigment in this size will produce a balanced feel of the color gray, and black will be adjusted if they are full, but in practice the result tends to be a dirty brown color.
Therefore, the fourth color is often used, that is black, as of Cyan, Magenta and yellow. The resulting color space is called directly with CMYK (Cyan, Magenta, Yellow, Black). Black called the "K" (key) of the term "key plate" in the printing (printing plate that create artistic detail in the image, usually using color ink black).
Many deplore the lack of user support for the CMYK color mode in the GIMP. For most designers and photographers, the image should be converted to CMYK colors so that it can get the results of high-quality prints. Because the color using the RGB 255-level gradation are CMYK only 100 levels of gradation, in short no color detail that can not be disimulasikan by the printer (device-based CMYK). One way to overcome the differences in the color conversion from RGB to CMYK is the 'calibration'. The process of color calibration is the process of matching colors to all the image processing device (image) using a similar standard. Arrange for it in that color on the monitor as a color range that only the most high-color display that can produce by the printer. So later when we print the results akan akan 'similar' as we tough in the monitor.
If you need a CMYK in GIMP plugin please download separate from the site + YellowMagic. Extract the file that is in the ZIP folder to a plug-in, and then restart GIMP. This feature can be found in the Image menu bar.
4. Install Liquid Rescale
Liquid Rescale is one of the favorite features of many users and cause a lot of time greeting ketikapertama introduced in Photoshop. This feature can change the dimensions of the image, as an example the picture with the dimensions of 16:9 to 4:3 without distortion occurs automatically with the pixels that are not needed in some areas. So you can change the image of narrow (vertical sweep) to wide format (widescreen) the content without the tense does not become uniform.
To add features to the Liquid Rescale GIMP, download the plugin from Wikidot and copy files that are downloaded to the plug-in folder. Restart GIMP.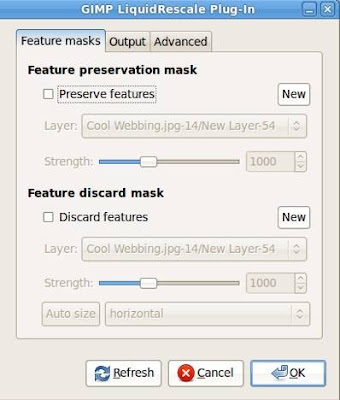
5. It is important to add the Brush
GIMP comes with a default amount of brush that is too little, and that there is there is too small, basic and not too useful. If you plan to create a graphical image, the list of libraries you need a new brush kerya to produce a more creative and rich. Install brush in GIMP just copy and paste the file in the folder and restart GIMP Brush to appear in the GIMP.
Brush you can download from various sources, depending on what type of brush you need. For example there is a place that provides various types of full brush that you can download for free, and that is BlendFu deviantART.
6. Unify Window
If you ask Photoshop to the user about the most they do not like GIMP's, most of them will agree with the Dock and display the toolbar that is separate from the main window. Canvas, and the layer toolbar, and the path Dock brush all fragmentary and into the desktop. For you do ygn skilled in the application window on the desktop with rapih may not have a problem, but for others the situation is the transgressor of them.
If a Dock window model separate in GIMP you as possible, collect windows to the main window with a right click on the Dock or toolbar and select Always on Top. Toolbar is now in the front / top of the main window, and the application will work as if in the Dock next to the main window.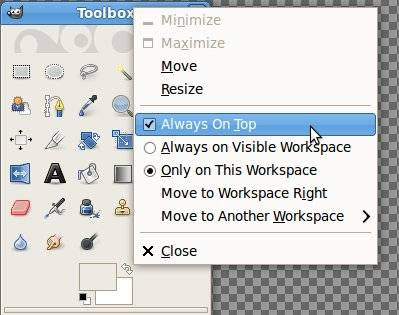
If you are still not quite satisfied with the result, two versions of the GIMP are available which have the look is very similar to Photoshop, the GIMPshop and GimPhoto.
7. Install Animation Packages
GIMP Animation Package, or common known as the GAP (GIMP Animation Package) to create an application GIMP can be used by the user to create an animation. GAP is widely used to create animated GIF files, and avatars, but also enough to be able to create animation such as a longer film, image and movement of the water that looks realistic.
GAP does not automatically have the package in the GIMP. You need to download from many locations on the internet, type in 'GIMP GAP' in the search engine. For users of the Mac OS, you can download and get a manual on the use of GAP-Systems. If your users can search for Ubuntu gimp-gap package in Synaptic.
8. Enabling GEGL
Based on information from Gimp.org, GEGL (Generic Graphical Library) is a new feature that can only be found in the GIMP version 2.6 and above as the core of the application to process the images.
"Many of the features desired by users can be provided easily through GEGL. Layer effects, layer groups, and adjustment layers are presented with quite simple (and be efficient) use of the organization DAG GEGL. Support for CMYK and high bit depth will be easier because GEGL does not make the same assumptions about the range of colors and types of data such as the GIMP. "
Although this feature is already available but not yet activated. Enough to activate the cursor to navigate menus bar Colors> Use GEGL and mark the box next to it. Time is active, you can use the tool that the tool is available on the Tools> GEGL Operations. Approximately there are thousands of different tools that can be applied on the layer and the image.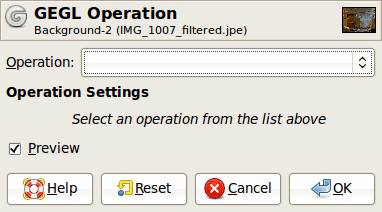
Conclusion
Settings in the top, plugins and add-ons to encourage GIMP can remove all the potential and maximize the assets. To be able to replace all the capabilities of the Photoshop still does not seem, at this time for Photoshop is still a best graphics application and will continue to add features and capabilities not found in the other application.
To monitor the development of features in the GIMP you can subscribe to the site information GIMP Registry. In addition, if you have tried to find search-plugin that right but does not find it, if enough experts you can create your own script with the GIMP Developers on the site.
Make GIMP To be worth Replace Photoshop
Posted by ABY MAULANA RAMADHAN | 9:07 PM | Computing, Software | 0 comments »Related Posts by Categories
Subscribe to:
Post Comments (Atom)


0 comments
Post a Comment